

JAKARTA - During this pandemic period, many people choose to stay and do activities at home, one of which is cooking. If you look at social media, nowadays it's easy to find food content or recipes.
However, keep in mind that creating food is not only a matter of taste, but also appearance, this aims to attract other people to like our recipes, or even if you sell them, they don't think long to buy them.
Therefore, special techniques are needed to capture photos of food or drinks that you will upload on social media. You can just use your cellphone without the need for a professional camera, here are simple tips that VOI quoted from Techradar and various sources, Friday, August 20.
1. Use Supporting Properties
Not many people realize that by using the property, the food that is photographed not only looks slicker, but will also give the impression of bright and dynamic colors in the photo.
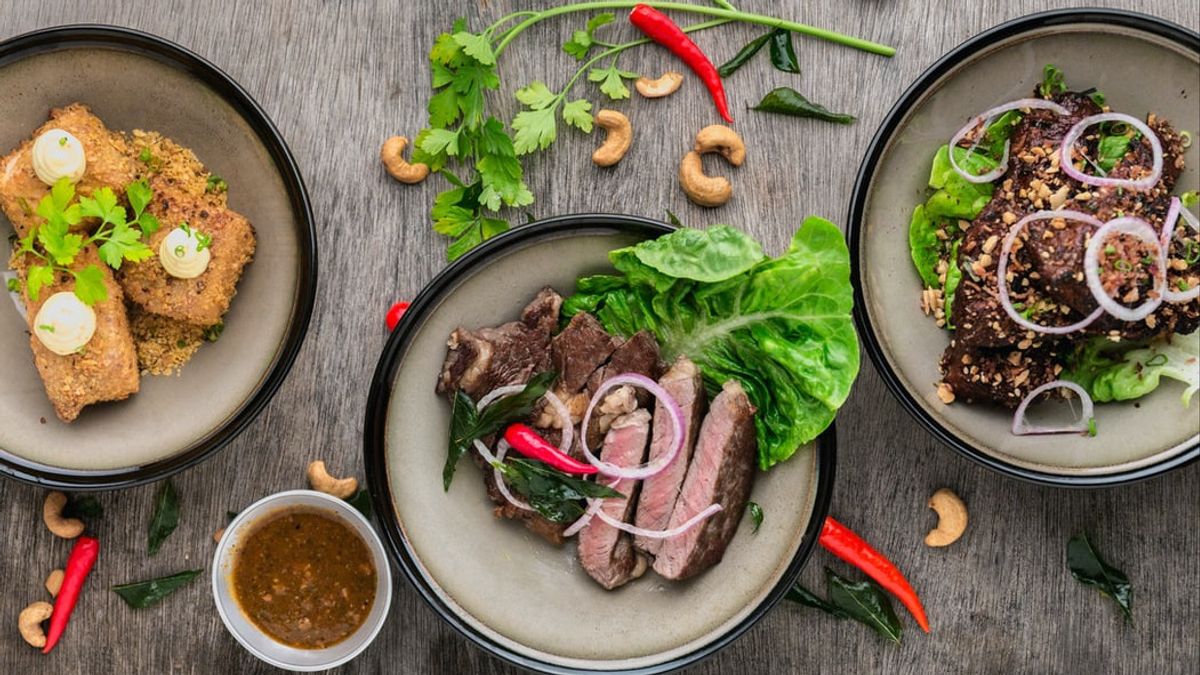
You can use natural properties such as spices, food ingredients, herbs, fruits, and others. There are also napkins, tablecloths, coasters or plates, cempal, tableware, cooking utensils, wooden mats, and so on.
Keep in mind, adding properties can't be arbitrary, you also have to adjust the property to the food you photograph. For example, rendang, you can use the properties of chili, a sprinkling of salt, lemongrass, and lime leaves.
2. Choose a Good Color
While black and white is common in food photography, using bold colors will make your food images stand out.
Look for bright colors when selecting potential subjects, remembering that not all colors will be as beautiful when photographed using a phone as they are in real life. For example, browns and beige tend to look less appetizing, while bright greens, yellows, and reds usually look good.
It's also useful for shooting in the best light you can, avoiding artificial and low light to give your phone's sensor a chance to reproduce the best details.
If you are photographing food indoors, try to get closer to a window to take advantage of the natural light coming in from outside for best results.
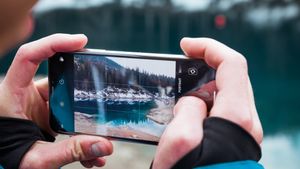
3. Use Portrait Mode
Professional photographer Tim Clinch shares a few tips for taking food photos using Portrait mode. Most smartphones have Portrait mode. Sometimes it can be called something else, like Aperture or Live Focus.
If you're looking for a mode that creates a shallow depth-of-field effect, and will help give your shots a professional edge. This mode will work best when the outline of your subject is clear or well defined.
"Portrait mode is a very useful tool in your arsenal, but be careful when photographing subjects like glasses. Often, it can't handle the edges of the glass and you end up with strange objects and often the glass can simply disappear," says Clinch.
SEE ALSO:
-
 | TEKNOLOGI
Apple Hadirkan Kemampuan Hilangkan Flare Pada Foto di iOS 15 Versi Beta 4
05 Agustus 2021, 17:22


4. Enable Gridlines
A professional photographer and content creator based in the Netherlands, Kratia Garwal often uses her phone for food shoots. Garwal provides recommendations for enabling gridlines on your phone's native camera app.
Most smartphones will offer this in the settings menu, “I always turn on this feature because it helps me to align the horizontal and vertical in my frames and also get my composition right, using the rule of thirds,” says Garwal.
Placing your subject where the gridlines intersect will usually make for a fun composition, but it's worth experimenting to see what makes it better.
5. Use Pro Mode or Third-Party Apps
If you have a smartphone that has Pro or Advanced mode, you can use it to great effect for food photography. Some phone models especially the iPhone, don't give you much control over the settings, in the same way, that a standard camera does. While this might be great for quick shots, third-party apps will allow you a wider choice of modes.
If you want to regain some of that control, Garwal recommends Adobe's all-in-one approach.
"Adobe Lightroom's mobile app has a fantastic feature where you can shoot directly from the app. Auto and Pro mode options are available, but it's very convenient to be able to control shutter speed, ISO, or white balance before pressing the shutter. It's something I often recommend to my workshop participants,” said Garwal.
6. Use a Tripod
If you follow a lot of foodie accounts on Instagram, chances are you're already very familiar with the concept of 'flat lay', where you can see your subject from above.
That said, for best results, it's also a good idea to keep your phone still and in one position. It will also free you to change the flat lay settings without having to recompose each time you take a shot.
Garwal uses a tripod like the Lamical Gooseneck model for top-down shots. He explains, “That way I can set the timer and not press the shutter myself. It frees up your hands and also helps avoid camera shake," explains Garwal.
7. Don't Forget to Edit Photos
Editing is an essential part of any professional photographer's workflow, and while most smartphones can already produce great shots straight from the camera, a few simple adjustments can make your shots even more stunning.


You can use photo editing apps on your phone like Adobe Photoshop, VSCO, and Snapseed. It is known that Tim Clinch and Kratia Garwal are big fans of the Snapseed app.
“With this tool you can selectively control brightness, exposure, temperature, and saturation. It's one of my favorite features," said Clinch.
The English, Chinese, Japanese, Arabic, and French versions are automatically generated by the AI. So there may still be inaccuracies in translating, please always see Indonesian as our main language. (system supported by DigitalSiber.id)
Add VOI as a Preferred Source
Follow VOI news updates across Google.
+
Popular


Related News


